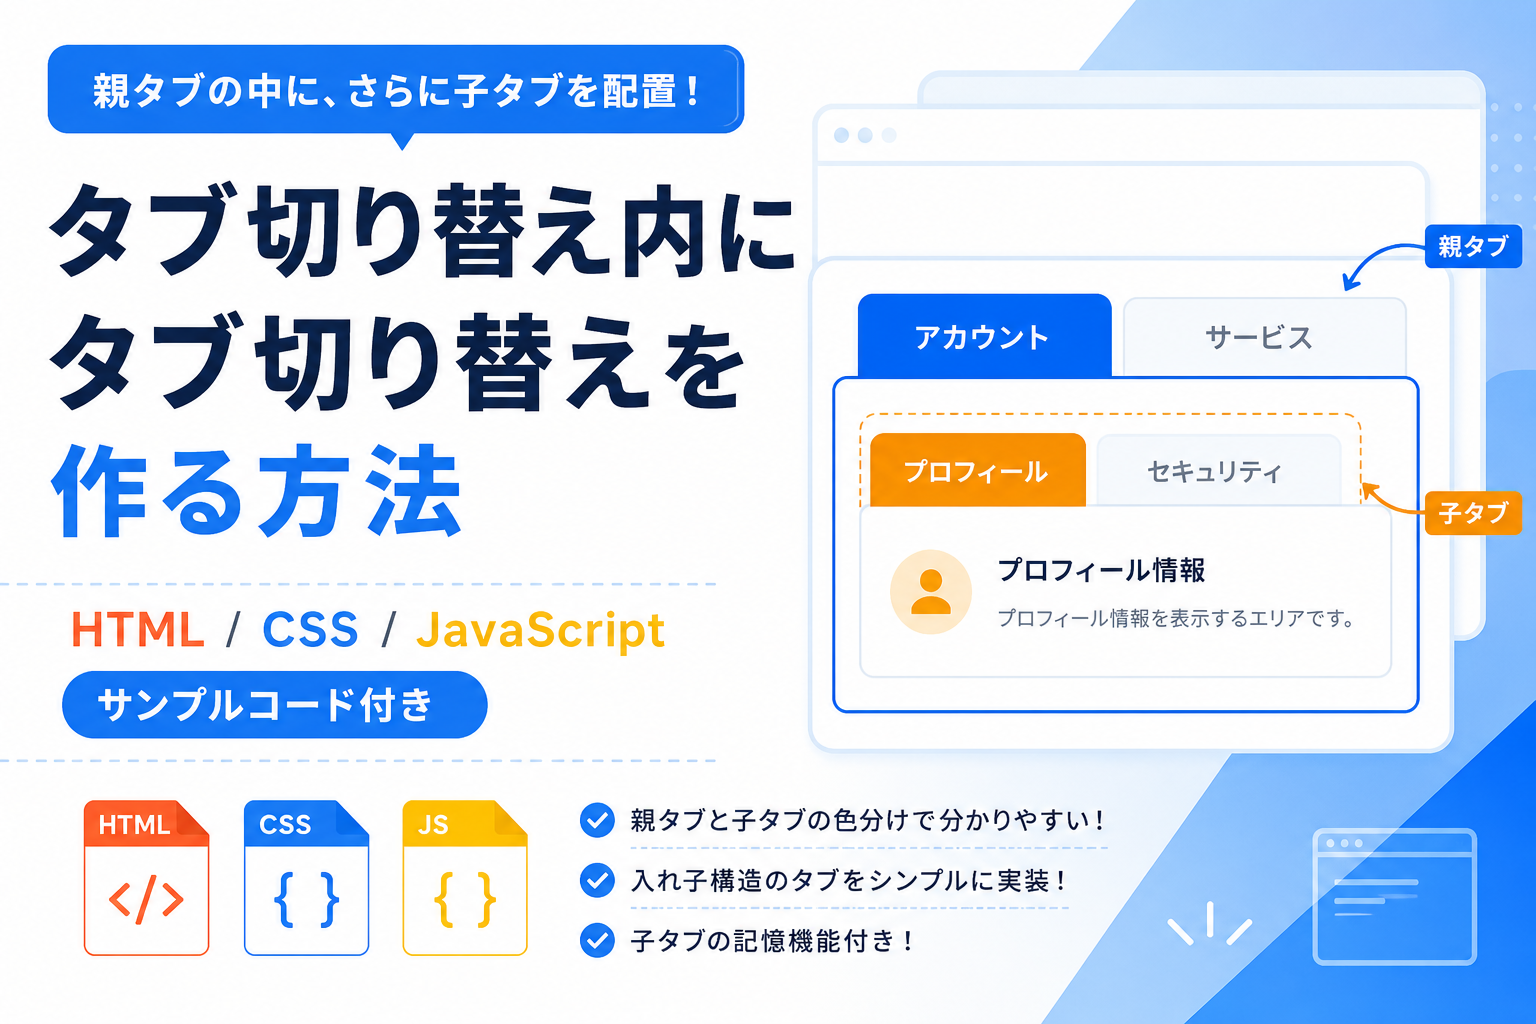
タブ切り替え内にタブ切り替えを作る方法
HTML・CSS・JavaScriptを使って、タブの中にさらに別のタブ切り替えを配置する方法を紹介します。このサンプルでは、親タブで大きな分類を切り替え、その中にある子タブでさらに細かい内容を切り替えられます。設定画面、管理画面、商品情報、マイページなど、情報量が多い画面を整理して表示したい場合に便利です。
コードについて
本記事のコードはサンプルコードです。ご利用前に必ず動作確認を行ってください。
免責事項 本コードの利用により発生した損害について、当サイトは一切の責任を負いません。
免責事項 本コードの利用により発生した損害について、当サイトは一切の責任を負いません。
デモ
タブ切り替え内にタブ切り替え
親タブと子タブを色分けしているため、入れ子構造が分かりやすくなっています。親タブを切り替えて戻ってきても、子タブは最後に選択した状態を維持します。
親タブ
子タブ
プロフィール情報を表示するエリアです。
セキュリティ情報を表示するエリアです。
子タブ
プラン情報を表示するエリアです。
支払い情報を表示するエリアです。
コードをコピーして使おう!
<!DOCTYPE html>
<html lang="ja">
<head>

  <!-- 文字コードを指定 -->
  <meta charset="UTF-8">

  <!-- スマホ表示に対応 -->
  <meta name="viewport" content="width=device-width, initial-scale=1.0">

  <!-- ページタイトル -->
  <title>タブ切り替え内にタブ切り替え</title>

  <!-- CSSファイルを読み込み -->
  <link rel="stylesheet" href="style.css">

</head>
<body>

  <!-- タブ全体を囲むエリア -->
  <div class="nested-tab-switch_wrap">

    <!-- タイトル -->
    <div class="nested-tab-switch_title">
      タブ切り替え内にタブ切り替え
    </div>

    <!-- 説明文 -->
    <p class="nested-tab-switch_text">
      親タブと子タブを色分けしているため、入れ子構造が分かりやすくなっています。親タブを切り替えて戻ってきても、子タブは最後に選択した状態を維持します。
    </p>

    <!-- 親タブエリア -->
    <div class="nested-tab-switch_parent_area">

      <div class="nested-tab-switch_parent_title">
        親タブ
      </div>

      <div class="nested-tab-switch_parent_tabs">

        <button class="nested-tab-switch_parent_tab is-active" type="button" data-parent-tab="account">
          アカウント
        </button>

        <button class="nested-tab-switch_parent_tab" type="button" data-parent-tab="service">
          サービス
        </button>

      </div>

    </div>

    <!-- アカウント親タブの内容 -->
    <div class="nested-tab-switch_parent_panel is-active" data-parent-panel="account">

      <div class="nested-tab-switch_child_area">

        <div class="nested-tab-switch_child_title">
          子タブ
        </div>

        <div class="nested-tab-switch_child_tabs">

          <button class="nested-tab-switch_child_tab is-active" type="button" data-child-tab="profile">
            プロフィール
          </button>

          <button class="nested-tab-switch_child_tab" type="button" data-child-tab="security">
            セキュリティ
          </button>

        </div>

        <div class="nested-tab-switch_child_panel is-active" data-child-panel="profile">
          <div class="nested-tab-switch_box">
            プロフィール情報を表示するエリアです。
          </div>
        </div>

        <div class="nested-tab-switch_child_panel" data-child-panel="security">
          <div class="nested-tab-switch_box">
            セキュリティ情報を表示するエリアです。
          </div>
        </div>

      </div>

    </div>

    <!-- サービス親タブの内容 -->
    <div class="nested-tab-switch_parent_panel" data-parent-panel="service">

      <div class="nested-tab-switch_child_area">

        <div class="nested-tab-switch_child_title">
          子タブ
        </div>

        <div class="nested-tab-switch_child_tabs">

          <button class="nested-tab-switch_child_tab is-active" type="button" data-child-tab="plan">
            プラン
          </button>

          <button class="nested-tab-switch_child_tab" type="button" data-child-tab="payment">
            支払い
          </button>

        </div>

        <div class="nested-tab-switch_child_panel is-active" data-child-panel="plan">
          <div class="nested-tab-switch_box">
            プラン情報を表示するエリアです。
          </div>
        </div>

        <div class="nested-tab-switch_child_panel" data-child-panel="payment">
          <div class="nested-tab-switch_box">
            支払い情報を表示するエリアです。
          </div>
        </div>

      </div>

    </div>

  </div>

  <!-- JavaScriptファイルを読み込み -->
  <script src="script.js"></script>

</body>
</html>ファイル構成と設置方法
このサンプルでは、HTML・CSS・JavaScriptをそれぞれ別ファイルに分けて使用します。index.html、style.css、script.js を同じフォルダに配置してください。
sample/
├── index.html
├── style.css
└── script.js
index.html をブラウザで開くと、タブ切り替え内にタブ切り替えを配置した動きを確認できます。親タブを切り替えても、それぞれの子タブは最後に選択した状態を維持します。
コメント